יום שישי, 19 ביולי 2013

מעמד למסך - פרוייקט פרידברג לחקר הגניזה


פרוייקט פרידברג לחקר הגניזה הנו ארגון העוסק במחקר ובהנגשת קטעי גניזת קהיר. כחלק ממחקרם, המתמקד בדיגיטיזציה של הקטעים ובהנגשתם באמצעות האינטרנט לחוקרים ולציבור הרחב, הם פתחו תוכנה המאפשרת לבדוק התאמה של קרעי גניזה אחד לשני. התוכנה עובדת עם מסך מגע.
מכיוון שממון רב מושקע בפרוייקט, שרוב תוצריו מצויים באינטרנט כתוכנה ולא כמוצר ממשי, הדרישות היו למעמד פיזי מרשים, בעל נוכחות חזקה. שם הפרוייקט צריך להופיע באופן בולט. המעמד מיועד להצגה בכנסים ובהרצאות, ועל כן עליו להיות פריק ונוח להעברה, למרות המסך הגדול והכבד.

המעמד הוא למסך מגע 50 אינצ', ששוקל כ-35 ק"ג. המעמד צריך לאפשר שימוש בעמידה או בישיבה, ועל כן עליו לאפשר כוונון למצבי עבודה שונים בהטיות שונות.


המוצר עשוי מסגרת ורגלים מעץ אגוז בשילוב מייפל, וכן מסגרת ברזל פנימית.
מידות כלליות (במצב שכיבה): גובה - 82 ס"מ, רוחב - 115 ס"מ, עומק 60 ס"מ.
מסגרת העץ עשוייה מעץ אגוז מלא, כשבחזית יצרתי קורת סנדביץ המודבקת 5 שכבות אגוז ומייפל לסירוגין.

המסגרת משתמשת במחברי שיניים ישרות / אצבעות (Box / Finger Joints) שיצרתי בעזרת ג'יג שתכנן המהנדס מתיאס ונדל הקנדי. תיאור מפורט ומורחב מאוד של הג'יג, יכולתיו וצורת בניתו נמצאים כאן, ותיאור ופירוט הג'יג האישי שבניתי נמצא באתרו כאן. נעיר כאן כי הג'יג הזה מאפשר ייצור מחברי שיניים בקשת אפשרויות רחבה מאוד ובמגוון התאמות בלתי מוגבל (לכל עובי משור ובכל קונפיגורציה). הראתי דוגמאות של המחבר שיצרתי בעזרת הג'יג למספר לא מבוטל של נגרים מקצועיים בירושלים, מהשורה הראשונה בתחום, איתם אני עובד באופן יומיומי כחלק מעבודתי בחברה קבלנית בתחום הבנייה בירושלים (התמחות בשוק היוקרה), והתגובות היו נדהמות מבחינת הדיוק וחוזק המחבר (גם ללא דבק כלל), ובהתחשב בשיטת הביצוע (על משור שולחני-קרייזיק המוצב בבית פרטי) ובמשך הביצוע (דקות ספורות).


שילוב המייפל נועד לתת קונטרסט גבוה לגוף האותיות, שנחרטו בכרסום קוני בכרסומת CNC על רקעו הכהה של האגוז, והוא גם מסייע ליצירת מראה ייחודי במחברי השיניים במבט הצד של המעמד. אני מאוד מרוצה מהתוצאה התלת ממדית, ומהאפקט שנוצר מהפונט הסריפי.


הרגליים המרובעות, בחתך 5.5X5.5 ס"מ, עשויות קורות עץ אגוז בעובי 1.5 ס"מ המחוברות בזיווי (45 מעלות) עם מילואת עץ אורן. במחשבה שניה לאחר מעשה- הייתי יוצר את הרגליים ללא מילואת האורן, אלא בקורות מלאות מודבקות בזיווי.
הקושרות עשויות עץ מלא ומחוברות לרגליים במחברי סין ונקב/גרז (Mortise and Tenon), ומחוזקות עם ברגים. הברגים מוסתרים בפקקים מדוייקים שחרטתי מעץ אגוז על מחרטת מתכת.
במחשבה שנייה לאחר מעשה: אני מתכנן לבנות את הג'יג של מתיאס ליצירת מחברי סין וגרז, מופיע כאן. במידה והמחבר מדוייק דיו - אין צורך בחיזוקים כלל. בכל מקרה, הייתי יכול לעשות את החיזוקים מדיבלים מעץ אגוז (במקום להסתפק בברגים בלבד).
המסך יושב בתוך מסגרת מתכת פנימית, המתכווננת בצורה פשוטה וקלה בעזרת מגבה, ומאפשרת עבודה בכל זווית בטווח שבין 100 ל-135 מעלות. השקעתי לא מעט זמן בתכנון המנגנון, כיצד ליצור אותו שישא את המשקל, איך לבנות את המעצור שיאפשר שימוש בטוח, וכו' וכו'. בהברקה של רגע הבנתי כי הג'ק של האוטו נותן את כל אלו בפשטות וביעילות. ובו באמת השתמשתי. תזכורת לעצמי: לקנות דחוף ג'ק חדש לאוטו.

כל עבודת הנגרות, כולל הקצעת העצים, פריסת הקורות, חריטת הדיבלים, שיופים, הדבקות וליטוש, נעשו בסדנה הביתית שלי (11 מ"ר),  מלבד מסגרת המתכת שבוצעה ע"י מסגר, חריטת האותיות שכורסמו על מכונת CNC, והלכה הסופית שיושמה בחדר צבע בנגרייה.


תמונות מתהליך העבודה:

אבטיפוס ראשוני מעץ אורן:


 הדבקת הקורה המרכזית - פרוניר אגוז, קורת מייפל, קורת אגוז (ליבה), קורת מייפל, פורניר אגוז:

הג'יג ליצירת מחברי האצבע:

הקורה לאחר כרסום האותיות - מוכנה ליצירת המחבר:

 יצירת המחברים:

כך נראה המחבר מוכן:


הכנת העצים להדבקת הרגליים, מנוסרים ב45 מעלות:

יצירת מחבר סין ונקב בין הרגליים לקושרות:

הדבקת המסגרת:

הדבקת הרגליים והקושרות:

שני החלקים מוכנים לליטוש:

ברגים לחיזוק המחבר:

 חריטת הפקקים להסתרת הברגים:

חורי הברגים מכוסים בפקקים:

יום שלישי, 24 ביולי 2012

יום שני, 2 ביולי 2012

שפתם העשירה (והנכחדת) של הנגרים


בעבר כתבתי כאן על השפה הארכאית העשירה שהשתמרה בצה"ל. הסיכום היה שדווקא בגלל שהצבא הוא מנגנון ותיק, מסורבל, כבד ומזיע, השתמרו בו פניני לשון ייחודיים ומרתקים, והמעוניין יעיין שם.
כל מי שקרוב לתחום הבנייה, התעשייה והמלאכה בארץ ודאי יודע כי הרבה מאוד מושגים מקצועיים וכלי עבודה השגורים בעגת הבנייה - מקורם בשפה הגרמנית. הדבר נובע מכך שמרבית התעשייה הטכנית, המכונות המתקדמות ולימודי ההנדסה בכלל באו מגרמניה באותה התקופה. הנה דוגמאות ספורות:
מעולם הבנייה: אינטרפוץ (ברז פנימי שיבוש של 'ברז תחתון' בגרמנית); גרונג (חיתוך אלכסוני); דריי-קיפ (מנגנון פתיחה כפול לחלון, צידי ועליון); שליכט (טיח, מלט בגרמנית); שטיכמוס (פלס צינור, ויש שקראו לו שלוך); שנוגריסט (נקודות ציון על ציר X וY) ועוד.
מכונות: אבריכט דיקט (מקצוע/ מכונת הקצעה חשמלית); קרייזיק (מסור שולחן נגרים עגול, 'מסור עגול' בגרמנית); פונטצוויג (רתכת נקודות); שלייף (מלטשת) ועוד.
[מעניין לציין אגב, שכלי עבודה חדשים יחסית שפותחו בעשרים השנה האחרונות, זכו לשמות אמריקאים, כגון: מברגת אימפקט, מסור ג'קסון (שיבוש של Jig Saw), פרייזר, ועוד].

אני רוצה לעשות ניתוח קצר לעגת הנגרות שכנראה הייתה קיימת בארץ. לא מזמן רכשתי מספר ספרים העוסקים בתכנון, שרטוט ובנייה בעץ, ספרים שהוציא משרד התעסוקה בשנות השישים והשבעים, ומלבד מספר עדכונים קלים לא נעשו בהם שינויים משמעותיים (אגב, הספרים ניתנים לרכישה כאן, ובמחירים נמוכים). הספרים קצת קשים לקריאה, שכן רוב המושגים המקצועיים הם בעברית, ואינם בשימוש היום. תשמעו, היתה להם עברית מדהימה. פנטזית, פומפוזית, מתלהבת ומתנשאת, אבל אילו מילים... זה מזכיר לי את התקופה (עד אמצע שנות התשעים) בהם התעקשו לתרגם את שמות הלהקות והשירים הלועזיים לעברית. כמה מסורבל זה היה אז...
יש מספר סיבות שניתן למנות מדוע רוב המילים שברשימה לא 'תפסו'. הסיבה העיקרית לדעתי היא שלימוד המקצועות הטכנולוגיים נעלם מהמפה. אורט כבר לא מכשיר כרסמים, חרטים, ויש בכל הארץ קורס אחד של משרד בתעסוקה בו ניתן ללמוד נגרות. אני גם לא חושב שבבית ספר יסודי מתקיימים היום שיעורי נגרות בחדר המלאכה שמכיל שולחנות נגרים רבים ומורה ותיק שצועק 'למה אתה לא עובד' - כמו שזכיתי אני בשנות התשעים. (כמובן שאז לא ידעתי להעריך את זה וזה היה השיעור הכי פחות אהוב עלי. טיפש). סיבה נוספת להעלמות השפה הטכנית היא ההתנשאות שלה, המסורבלות והתחשיבות העצמית. כן, זה אולי נשמע קצת מוזר, אבל שימו לב כמה כלי העבודה והמושגים לא זוכים לשמות משל עצמם, פשוטים, קלים, שימושיים, אלא מקבלים סמיכויות מורכבות בבניינים כבדים (גלגלי תמסורת דרוגים, למשל).
ריכזתי ברשימה את כל המילים והמושגים שמצאתי בהם עניין. אני גם משוכנע שיש לי כאן טעויות, אשמח לשמוע תגובות. כמו כן- אם יש למישהו השערה לגבי מקורה של מילה מסויימת (גייצת? גובתה? לזבז? משע?) - אשמח לשמוע גם. תהנו

כלים
גובתה - פוטר, תפסנית, ראש המקדחה/כרסומת
גייצת / מכונת גיוץ / מגייצת - משפחת כלים בעלי גובתה, לפי הפירוט הבא:
גייצת לזבזי שפה - טרימר
גייצת עילית – כרסומת
גייצת עילית ידנית - ראוטר
גייצת שולחנית - פרייזר
גייצת שיניים – צינקים
גייצת שרשרת


גשש אורך מתכוונן – קליבר(?)
דופן מוספת - דופן כפולה
דקר
זוויתון - זוית 90 מעלות ממתכת/עץ
זויתון ליכסון - זוית 45 מעלות
זחון / מד זחיח - קליבר
חוגן - קליבר לחלקים עגולים
חוגן גשש - קליבר לעומק (חלקו האחורי של הקליבר הסטנדרטי)
חף – דיבל עץ
חף פטנט – דיבל פלסטיק לקיר
כוש / גל - גלגל (למשל: כוש סכינים, כוש המנוע)
מברג מצולב – מברג פיליפס
מברגה נוקשת - מברגת אימפקט
מברז - מכשיר ליצירת הברגה/הברזה בקדח. ע"פ הגמרא בסנהדרין נו', הפועל ב.ר.ז משמעותו ליצור נקב או לדקור. כאן הפועל הפך לשם עצם של המכשיר, כמו מברג. למעשה, גם הברז נקרא על שם החור/קדח שבו. (י.מ)
מדגש – ליצירת נקב כהכנה לקדיחה
מזוית - זוית מתכוננת
מחרוקת – ליצירת הברגה על מוט
מיתד - דיבל
מגלול - סרט מידה, 'מטר' בפי העם
מכפתיים / מלקחה כללית - פלאייר
מלזבזת שפות - מכונת קנטים
מלקחת רב מפתחים - ג'פקה (על שם המפתחים הרבים שניתן לבצע איתה)
מסכסכת – כלי לסכסוך שיניים, דהיינו הטייתם אחד לימין אחד לשמאל. ע"פ לשון הגמרא בחולין יז' - סכין מסוכסכת - כשרה, והכוונה שם שהסכין אינה חלקה לחלוטין אלא יש בה שינון כלשהוא. (י.מ)
מסרט - לחירוץ קוי סימון דקים על העץ
מפתח גביע - בוקסה
מקדד - בעל חתך משולש, משמש להרחבת קדחים
מקדחת ארכובה - מקדחה ידנית
משוף - כלי לשיוף (שופין) בעל שיניים גדולות
משע / פלדת מישע - ציקלינה (לוח מתכת מושחז המשמש להקצעה)
משען דפינה - גדר המסור / המקצוע
משקע – כלי ליצירת שקע לראש בורג
סרד - חירוץ קווים מקבילים לשפת טעון-העיבוד
עבד - עמוד עזר לשולחן נגרים
פצירה – שופין מתכת בתצורת מחט
קליבה - מלחציים
קופת לטש – מחדד (אילתור לפני המצאת המחדד)
שופין - כלי שיוף בעל שיניים זעירות
שופין מגוייץ - בעל זוית חיתוך חדה
שופין מוחרק - בעל זוית חיתוך קהה

מושגים
בורג ראש מכודר – בורג בעל ראש עגול
גלגלי תמסורת דרוגים - מערכת שינוי מהירות ידנית
דלת ניגפת - דלת ארון
דלת צניחה/צונחת - דלת קלפה
השאה (שין ימנית) - הסרת גרד. לדוגמא: משיאים להב של מסור באבן השאה. [ע"פ המשנה במסכת ביצה ג' ז, "אין משחיזים את הסכין, אבל משיאה על גבי חברתה" - תודה לישראל מלכיאל]
חיפוי תחיב –
חפיה - OVERLAP

חפים טופחים  - עוגן כימי (טופח - דבר שנרטב מנוזל, ולא תופח כמו שכותבים היום, ע"פ לשון המשנה בטהרות). 
טעון-עיבוד - חלק העץ עליו עובדים, מעניין שהיום קוראים לו 'עובד', וכפי שהעיר בצדק אלישע דביר - מדובר בשיבוש. אני זוכר מתקופת הלימודים שהמורה היה קורא לזה 'נעבד', וזוהי האופציה המועדפת עלי.
כרכוב - פרופיל דקורטיבי. כגון עץ מפוסל או מעוטר. דבר מכורכב הינו בעל עיטורים.
לווח (ברבים: לווחים) - לוחות דקים וצרים, 8 עד 10 ס"מ
לזבז (ברבים: לזבזים) - כמו לווחים אך צרים יותר [ע"פ המשנה במסכת כלים יט' ט, "תיבה שפתחה מצדה טמאה מדרס וטמא מת. אמר רבי יוסי אימתי בזמן שאינה גבוהה י' טפחים או שאין לה לזבז טפח". - תודה לרוני שויקה]
לזבז שפה / סרגל שפה – קנט. מכונה לליזבוז שפות היא מכונת קנטים
לזבז קיר - פנל
לביד, לבוד - דיקט
לולייני - ספירלי. דוגמא: מקדח לולייני. ע"פ לשון הגמרא בנדרים נא., הכוונה למשהו מדורג.
לחם - החומר הנוצר בעת הלחמת מתכת
מדפים שחילים -  מדפים המושחלים על מסילות

מלבן מוגח - משקוף סמוי לדלת
מסד - סוקל
מחבר חף רגיל/זויתי (ברבים: חפים) - דיבל.
מילואה - המילוי, הבפנים (של הדלת, או של כל דבר אחר)
נפולת - פחת. למשל: נפולת החיתוך/הניסור היא החומר שהולך לאיבוד בגלל עובי המסור. נפולת הייצור - מוצרים שנפסלים לשיווק עקב תקלות ייצור.
סיכסוך - קצות שיני מסור המוטים לסירוגין - פעם לשמאל ופעם לימין.
סיקוס (ברבים: סיקוסים) עיניים בעץ
סימרור - חיבור עם מסמרות (מסמרים), נעשה בעזרת המסמרה
פס רגליים - פנל
צביעת צריבה - בייץ
ציר/דלת מטוטלת (ברבים: צירים מטוטלים) - דלת נפתחת לשני כיוונים (דלת בארים)
שינון - צורת השיניים בלהב המשור
שפה (ברבים: שפות) – קנט, קנטים
שגם – מחבר, בליטה. למשל: לוח משוגם
שגם מגוייץ
תברוגת - הברגה


מחברים
שגם ומגרעת - tongue and groove
סין וגרז - mortise and tennon
סין וגרז בזיווי - Mitered-Face Mortise-and-Tenon Joint
שיני גרז
שיני גרז במחבר פינה/קמץ
מחבר חפייה / חף עובר  - lap joint
זנביון בחפיה -  blind dovetail  / lap dovetail
חפי פינה מזווים
חיבור זיווי בשגם – miter key joint
מחבר מיותד  -  wedge joint
מחבר שדר
מחבר פינה
כפיסים - למלו
מישק שגום, מישק מדורג
מישק שגם תחוב
לזבז גדען פס שדר
לזבז גדע מיותד
מחבר חפייה בזיווי
חיבור אצבעות
סין וטריז
סין ונקב
סין ונקב עם טריז
סין מושחל
סין שגום ונקב
פינה מונחת / מדורגת
שגם תחוב

מבחן מסכם.
1. הסבר והדגם: מהי דלת מוספת לזבזי עץ גושי?
2. מתי תבחר מילואה בדרג מחוזרת בפסיסים, ומתי תעדיף מילואה מכורכבת?


תודות לאנשים שתרמו לרשימה זו: ישראל מלכיאל, רוני שויקה, אלישע דביר, אוריה שוחט, אבי הרשברג

יום שני, 16 באפריל 2012

Clock-Wise

Clock-Wise
A more-or-less Precision Clock.


This clock was developed for the exhibition "Invisible Powers - Between Art and Science" which was held at the 'Bloomfield Science Museum' in Jerusalem at the 22 of march.


This is a digital wall clock, in which the display is consisted of standard florescent tube lights (60 cm length each), which gives a total measure of about 2 X 4 meters.
Each tube-light (which serves as one segment) is controlled by a standard 24hrs-plug-in Time Switch. This array simulates the concept of Seven Segment Display (SSD) with basic and daily objects, and more important, without a main computing device. 

The standard  time-switch devices are based on a 24hrs clock divided to 96 switches of 15 minutes each. This fact limits my clock-display to show the time in gaps of 15 minutes (i.e 8:00; 8:15; 8:30; 8:45.. etc)
BUT, by adding an illuminated sign on the top of the clock, I have reduced the tolerance of inaccuracy from 15 minutes to only 7.5 minutes. the sign reads in Hebrew "A bit before" OR "A bit after" and changes between these two options every 7.5 minutes (this is controlled by electronic time switch).

A. The fact that the 'mind' of the clock is divided between almost 20 separate components,  causes an interesting and unpredictable incident every time the clock changes the display. the independence of each switch brings a time gap of up to 3 minutes in which the display can be unreadable or missing, till all the segments are in correct position (on or off). This, together with the natural flickering of the florescent tube lights, is where, in my opinion, the clock shifts from science to art. 

B. Indeed, it is a ridiculous idea. imagine that you are in a car, and you need to navigate to an unknown place, but instead of one voice GPS navigator you have TWENTY in the car, all working at the same time, giving you different instructions. at the end of the day, they will all bring you to your place, but they will give you a great headache... I made an effort to reduce the number of the switches to minimum. if you will look carefully you will notice that the first digit from the right is operated with one switch only. this is because this digit needs to show only the numbers 0 or 5, and i have managed to control that with only one clock by adding a NC NO contactor.


C. Against all odds, and while breaking some of the basic rational methods that I am familiar with, This clock as a whole keeps the time in a surprising accuracy. Truth needs to be said, adjusting this clock is a nightmare. it takes about an hour to adjust all the switches together, and from time to time one switch or another needs some additional adjustment. Unfortunately, a week after i installed the clock, the time in Israel was advanced to daylight saving time mode, so i had to repeat the process all over again.... 

D. this clock is representing time in a way which resembles a mechanical clock. usually when we look at the dials of the clock, we cant precise the accurate time, and we prefer to round it to the nearest number. in this clock, the attitude of 'a bit before/after' reminds me the same approach. furthermore, Since every time switch is consisted of spur gears and its movement is mechanic (there is even an escapement wheel inside!), It makes this clock a true digital-Mechanical clock.

E. One last thought, it was an interesting experience to work at the museum, under the deadline of the exhibition opening. looking at the clock from time to time, and getting only a rough idea of what time it is (a bit before, a bit after)... was a bit stressing, but i never felt that i am not aware of the time. it was exactly what I needed to know at that time. also ive noticed that people are way less patience then what i have expected, art or not an art, some have already complained to the museum that the clock is not working...

prototype

A photo album that shows the process of designing and building the clock can be found here


Hope you liked the clock. feel free to comment below (no sign-up needed) or to contact me by email for further information. If you find this project interesting, you may want to have a look at another clock i have built to the same exhibition, dealing with the same concepts but with a totally different approach. see below or here

Elyasaf Shweka


יום שישי, 30 במרץ 2012

Analog Clock in a Digital World


This clock was developed for the exhibition "Invisible Powers - Between Art and science" which was held at the 'Bloomfield Science Museum' in Jerusalem at the 22 of march.

Front View

Rear View


Name: Analog clock in a digital world
Description: A pendulum wooden clock, that displays the time in a digital form.
How it works (in short): a wooden pendulum system signals to an optical sensor. This sensor operates a small motor which drives a transmission gear train, which operates a digital display.

The Mechanism


A detailed description:

The object is composed of three main components:

1. Minutes Counter


Optical sensor on the Escapement wheel 
The clock sends an electric signal every minute, using no electricity (except the optical sensor)
How it works: Basically it is a Wooden pendulum clock without the dials. 
The weight (stainless steel rod) drives the gear train. the escapement wheel completes a full cycle every full minute. An optical sensor recognizes a white sticker which is held on the front of the escapement wheel. that sensor drives a small motor, which completes a full cycle every time it gets a signal from the sensor, i.e., every one minute the motor gets into operation and quickly turns one cycle exactly.
Materials: Plywood [cut by CNC machine], Brass rods, stainless steel weight
How it was made: The plywood gears and frame were cut in CNC machine, using 3mm cutter.
Credits: The gear train itself and the frame design is based on the 'Primus' clock, designed by David Atkinson, with some changes (plans can be bought here)


2. Transmission Gear Train
this part controls the display. stainless steel bearing-balls are held in perspex wheels, and when in the right position they close an electric circuit and turn on the led strip which lights the suitable display-segment (made from 3 layers of sanded perspex).


How it works:
There are four SSD (seven-segment-display) digits in the clock, marked from 1 to 4, when 1 is the first digit from the right.
There are four gear compounds, marked from A to D, when A is the first gear from the right.
In order to show the time correctly:

digit #1 needs the ability to show digits 0,1,2,3,4,5,6,7,8,9 (ten options)
digit #2 need to shows digits 0-5 (six options)
digit #3 needs to show 0-9 (ten options)
and digit #4 shows 0 or 1 (two options), Since it is a 12 hrs display,

gear A controls digit #1
gear B controls digit #2
gear C controls digit 3 AND 4
gear D controls the AM/PM display.


the input comes from the attached electric motor, which turns one turn every minute (speed of about 12 rpm).
the electric motor turns gear-A 1/10 of a turn.
aftergear-A turns a full cycle,
it turns gear-B 1/6 of a turn

After gear-B turns a full cycle,
it turns gear-C a 1/12 of a turn

and after gear-C turns a full cycle,
it turns Gear-D 1/6 of a cycle.

The odometer gears can be seen between the acrylic circles
the mechanism that drives this system is an adaptation of Odometer mechanism. this mechanism is the one that you can see in every car, measuring the total mileage/kilometer that the car drove. the mechanism in my clock, though, is much more complex, since odometer drives each digit by the ratio of 1 to 10, while in this clock the ratio is changed every digits, like I explained above. the mechanism was built from MDF, and is 10 times bigger then the average odometer mechanism.


Here is a video that shows how the transmission system works. for testing purposes, the electric motor is working continually. on the real clock it is running one cycle every one full minute.


An early version of the acrylic compound


the gear compounds are an array of acrylic circles, connected with threaded rods and with precise spacers. this array can hold stainless steel balls in a specific place, which allows enough room to move but not to fall out. when a compound turns, the balls at the bottom lay on a 2mm threaded rod, and by that it closes an electric circuit and turns on the relevant segment.


Rear View


How it was made: All gears were designed with the program Gear Template Generator, made by the very talented Mattias Wandels. the gears, made from MDF, were cut by a laser machine after exporting the gears to DXF format.
Materials: 4 mm Perspex, 6mm MDF, Stainless steel bearing balls (12.6 mm), 6mm threaded rods, sleeve nuts

3. Display
A 4-digit seven segment display
Materials: 6mm MDF, 3 layers 4mm sanded perspex, 28 red smd led stripes, 


Notes:
the motivation for relying on metal balls to close an electric circuit was based on the understanding that the pressure should be reduced to minimum. any kind of switch with a spring would require force to press on it (whether it NC or NO) and since that one turn of the gear can turn almost 28 switches on (at worst case scenario, when it moves from 11:59 to 12:00), the friction would be too much for a small motor to carry. 
The disadvantage is that this kind of contact is very delicate and fragile, and even the slightest shock can cause the ball to move and to loose the contact, and therefor to disrupt the digital display. The clock needs more work in order to improve its movement. I belive i will find the time to omprove it, and this wont be the final configuration.

The product was designed and built by Elyasaf Shweka, Industrial designer, currently works at A contracting company in Jerusalem, And with the intensive help of Nir Shweka, an architecture student.

The next video shows time changing on clock


The Process:
Trying to invent a new mechanism is not as easy as it seems.
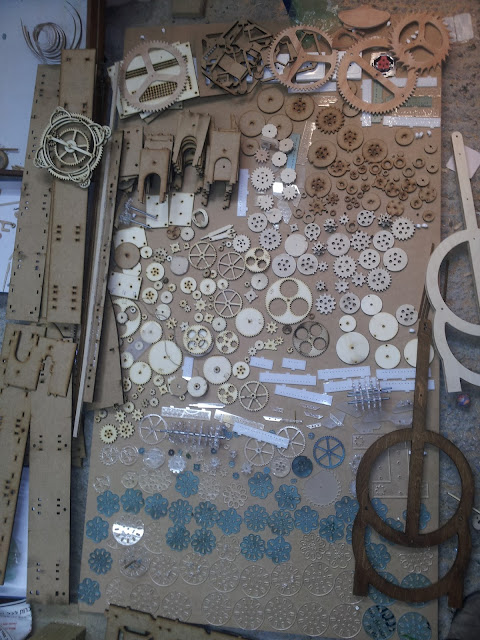
In this photo you can see all the parts that are being made by laser cutting and by CNC. All these parts are in the clock you see above.  its not all the parts of the clock, but most of them:


Here are some of the pieces i made during the process (3 last months) and I didn't use at the end. they are all not useful now, but every part here had its job to advance me toward the goal. It is recommended to englare the picture....

I would love to hear your comments, tips, improvements etc. about this project. feel free to comment below (no sign-up needed) or to email me at shwekwek@gmail.com

More images of the project can be viewed here:


Analog Clock in a Digital World

You are also welcome to check out another clock that I did to the same exhibition, similar concept with a different approach. HERE


Control Panel


ארכיון הבלוג